


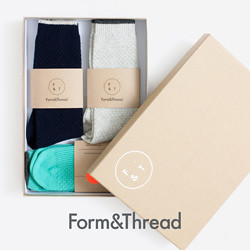
My Latest Flatlay - Sunglasses
by Monokel Eyewear | Moisteriser c/o La Mer | Razor by Harry's | Shirt
by Jigsaw | RI x Matthew Miller trousers c/o River Island | Hops & Barley Magazine
| Blue Bottle Coffee | Instax Photos | Vans Sneakers c/o Farfetch | Wallet by Campbell Cole
The
idea for this blog post came to me a few weeks ago, when I received a
message on Instagram from someone asking me for advice on achieving a
great flatlay. I was flattered that they had reached out to me with such
positive words, but I found the question quiet tricky to answer,
because, is there really a recipe to creating a "great" flatlay?
I've
never been a person to tell people what's right and what's wrong, I've
always favoured going down the route of giving my opinion on how I find
it best to go about a certain process, and my thinking being creative
ideas / problem solving. I've found that by doing this I get around
being "that person" who tells us what we should be wearing or how to do
things the right way. That just isn't me.
With that in mind, below I've outlined my thought process when it comes to creating flatlay images for my social accounts (mainly on Instagram @mat_buckets). This style of image seems to resonate as well with my audience as it does with brands. Hopefully you'll take away some new ideas from my two cents on the subject.
The Tools I Use
There's
nothing too flashy about what I use to create my images; I usually
stand on top of a 5" ladder, with the items laid out on our white
bedsheets. I don't worry too much about creases as they can work in your
favour, but we'll come to that later. My current camera of choice is
the Lumix GX7, which works great if you're looking for clean images with
a natural colour balance.
Theme + Story
Before
I start chucking things all over the place I like to have a clear theme
in my head. This helps me pick suitable items that will not only work
nicely together, but will be the basis of the caption that accompanies
it. By doing this I find it avoids things feeling random and
disconnected. Fortunately I do get gifted items from time to time, but I
don't just want to bung any old thing up because it's this week's
"blogger mail".
For my latest image decided on the theme of "holiday pick-ups / post-wedding relaxation". The colour of the Vans Old Skool sneakers c/o Farfetch, worked perfectly against Hop & Barley magazine and La Mer moisteriser. I also love the way the various shades of blue pop out.
Proportion + Space
Thing
one is big deal for me, and it probably the most time consuming aspect
of creating a flaylay. Generally I'll shoot on a white background, as it
feels like the ideal blank canvas to tell a story, but sometimes I'll
shoot on the carpet or floorboards - depending on the light, or if I'm
trying to mix up my Instagram feed a little. I'll start by placing the
bigger items down first, then adding accessories, reading material and
lifestyle products around and overlaid. If the item isn't overlaid with
another product I like to make sure there's a few inches of space, then
I'll twist each item left + right until it looks good on camera.
There's
a lot of running up and down the ladder at this point, checking each
item looks right and the proportions of each is pleasing on the camera.
Generally I'll try to keep a couple of corners clear from product, with
the aim to help lead your eye to certain areas of the image. My latest
image took me about 20 minutes to get right before I was completely
happy, with a few minutes of editing time.
Colour
Quite
simply put, once I've worked out a theme for my image I'll select
products which compliment each other, in terms of colour. So if there's
some yellow text on a magazine I'll try (but not always) to weave in a
little yellow somewhere else in the image. Tonal and colour-blocking
seems to work really nicely too.
Would You Wear It Together / Is Anything A Conflict?
This
always crosses my mind when I'm corralling my items for a new image.
Would I actually use these items together? For example, would a razor be
in the same situation as a bowl of porridge? If it tells the story
you're trying to get across then super, but generally I try to keep
things as natural as possible!
Using Light
We
are fortunately enough to live a house on a corner plot, so we have a
decent amount of natural light coming from all angle. I try to take my
images at a similar time of the day - around 11am - to keep a consistent
lighting style each time. But if it's sunny I mess about with the angle
of the blinds, which helps with highlighting certain areas of the
set-up + adding shadows to create depth (this is where the creases on
the bedsheets can help!). Play about until something interesting
happens!
Finding Your Own Style
It's
all trial and error, so just experiment with colours, light and ways of
laying out your images in a few different corners of your home (or even
outside...there's no restriction after all). I feel like I've found a
style that works for me, but I'm always keen to experiment with
something new to keep things fresh.
I
hope some of you guys have found this post helpful in some way, and do
let me know if you use any of the tips when creating images for your
Instagram account. Drop your IG username in the comments and let's
connect!


Love this post, plenty of brilliant tips. Taking images at a similar time of the day is a great idea, something I never try!
ReplyDeleteKatrina Sophia
Great to hear a bit of "behind the scenes" from your posting!
ReplyDeleteThis post makes me feel like I'm really rushing any images that I take for my Instagram now. I think I may actually start dedicating some time aside to play around with ideas and styles to find what works for me.
ReplyDeleteYour images are always so clean, it's great to get an insight into the process behind them.
I'm over at @impeterblog
Peter
I found this really helpful, man!
ReplyDeleteDefinitely going to try to start experimenting more with lighting and the blinds to see if I can make some positive changes to my lays.
My insta is: playjackthesky
Enjoy your day!
Some good insight here Mat. I'm glad you shined a light on erm light. It's so important for photos, especially indoors. Try taking it when it's quite dark and you're left with a noisy mess.
ReplyDeletewww.jordanbunker.uk
I really need to step up the flatlay game! I am sure these tips are going to be very useful 👌🏼
ReplyDeleteZoel Hernández | zoelhernandez.com
Thanks Jman. I do feel that natural light is very important, however you decide to use it, and in your case for a much darker feel. Yours stand out so much, being a all round moodier vibe.
ReplyDeleteReally enjoyed that piece. Definitely learned a few things that I am going to use for my flat lays in the future. I'm at www.dapperdavecash.com or @dapperdavecash for my social media
ReplyDeleteThanks for the tips Matt, always wondered how you get a perfect flatlay shot that isn't riddled with shadows! Gonna give the ladder a try, beats standing on tiptoes!
ReplyDeleteNick | http://lifeofman.co.uk
These are such great tips! I always love learning about how people develop photos, so this really helpful! Thanks for sharing!
ReplyDeletehttp://roadesque.com
http://ourruins.com
Love this, Matt! Thanks for sharing your tips!
ReplyDelete@ediadegbola
عمليات التنظيف ونقل الاثاث ومكافحة الحشرات والعزل هي عمليات ضرورية جدًا ، وذلك للمحافظة على صحة أطفالنا ووقتنا من الضياع ولكن عملية التنظيف مرهقة للغاية وايضا النقل من مكان لاخر ، ويؤدي ذلك إلى الإهمال في الاهتمام بتلك العمليات مما يترتب عليها الكثير من التعب والأمراض ، لذلك نقدم لكم افضل خدماتنا كما نقدم العديد من الخدمات الاخري مثل
ReplyDeleteشركة نقل عفش بالطائف
شركة تنظيف بالطائف
شركة تنظيف بالبخار بالطائف
شركة مكافحة حشرات بالطائف
شركة عزل اسطح بالطائف
https://saudi-home.com/
شركة نقل اثاث بالدمام
ReplyDeleteأسعى دائمًا للحصول على خدمات نقل الأثاث التي يتم تقديمها طبقًا لأنظمة وخطط موضوعة مسبقًا، وسوف تعرف السر وراء هذا الاختيار عندما تجرب خدمات إحدى شركات نقل الأثاث بالدمام التي تستخدم هذه النظرية، ومن أمثلة تلك الشركات المنظمة شركة نقل اثاث بالدمام التي فور تلقيها مكالمة العميل التليفونية تقوم بإرسال فرد متخصص في إتمام الاتفاقات مع العملاء للاتفاق معك على موعد نقل الأثاث وأسعار النقل حسب عدد الأثاث ومسافة النقل، وبعد إتمام الاتفاق وامضاء العقد يبدأ العمل الجاد في نقل الأثاث بمنتهى الشفافية والأمانة.
التزام وأمانة شركة نقل عفش بالدمام
في الموعد المبرم الاتفاق عليه مع شركة نقل عفش بالدمام يصل إليك بالدمام المتخصصين في فك الأثاث ليقوموا بمهمتهم بإنجاز وإيجاز، ومن ثم تتم أعمال التغليف الحامية من الصدمات أثناء النقل على أيدي حرفيين، وتتوالى خطوات النقل من تنزيل وتحميل أثاث بالعربات، ثم رفع وتركيب دقيق دون أي مشاكل، حقًا أنها خدمات نقل أثاث راقية المستوى.
أسرار تفوق شركتنا واتخاذها مثال ناجح لباقي شركات النقل
التفوق دائمًا يحتاج إلى تعب ومثابرة وعدم استسلام، وهذا ما تمسكت به شركة تخزين اثاث بالدمام حتى وصلت إلى أعلى درجات النجاح ويرجع سر نجاحها إلى الآتي:
• امتلاكها عدد ضخم من عمال نقل وتركيب الأثاث المحترفين في تخصصاتهم بجانب امتلاكها لعربات نقل أثاث عددها يفوق أي عدد آخر تملكه شركات النقل الأخرى بالدمام.
• إدخال الخطط والتقنيات الحديثة في نقل الأثاث المتبعة في بلاد الغرب، بجانب بحثها المستمر عن أفضل معدات رفع وتنزيل الأثاث.
• التزامها بأي اتفاق تم عقده مع العميل مسبقًا دون أي تقصير متعمد، وإن حدث تقصير من أفراد العمل دون قصد تتحمل هي التكاليف والأضرار.
شركة نقل اثاث بالخبر
شركة نقل اثاث بالجبيل
شركة نقل اثاث بالقطيف
شركة تخزين اثاث بالخبر
شركة تخزين اثاث بالجبيل
شركة تخزين اثاث بالقطيف
شركة نقل اثاث بالدمام
ReplyDeleteهل تبحث عن التميز في شركات نقل الأثاث بالدمام؟ لا تكلف نفسك عناء البحث طويلًا، إذ أن شركة نقل عفش بالدمام بين يديك تقدم لك عمليات نقل عفش وموبيليا متميزة، وذلك لاننا جميعًا بشركة نقل العفش بالدمام لدينا خبرات عديدة ومهارات لا بأس بها في هذا المجال الخدمي، ونعطي كل خطوة من خطوات نقل الأثاث حقها في الاهتمام والتركيز لذلك نحقق نقل اثاث سريع خالي من الأخطاء وبلا خدوش وكسور بالقطع الثمينة سهلة الكسر ومن الأمور التي ساهمت في زيادة قدرتنا على حماية الأثاث من أي إصابات وكدمات متوقعة هو تلك المواد التي نستخدمها في تغليف قطع الأثاث قبل نقلها، حيث أننا نستعين بالبلاستيك المليء بالفقاعات وهو رائع في تحقيق الحماية ونستخدم أيضًا البلاستيك ناعم الملمس ذات الجودة والتماسك الواضح هذا بجانب استخدامنا إلى الكرتون واللاصق القوى، وفي تثبيت الأثاث كنوع من الاستعداد للنقل نستخدم الحبال المتينة، فنحن نعدك أن نحافظ على أثاثك وننقله بكل احترافية.
شركة نقل اثاث بالخبر
شركة نقل اثاث بالجبيل
شركة نقل اثاث بالقطيف
شركة تخزين اثاث بالدمام
هل تعلم الخطوات الأساسية التي تتبعها الشركات المحترفة في تخزين الأثاث؟ هل تعلم أن أكثر الشركات احترافية في هذا التخصص الخدمي هي شركة تخزين اثاث بالدمام التي تسير على نهج الخطوات التالية في إنجاز كافة الخدمات الموكلة إليها:
• أخذ العنوان صحيحًا من العميل والالتزام بالوصول في الموعد دون أي تأخير يُذكر.
• البدء في نظام بفك كافة أنواع الأثاث سواء كان خشبي أو غير ذلك والعمل على الإنجاز السريع في هذه الخطوة التي تعتمد السرعة فيها على مقدار الخبرات السابقة.
• استخدام أجود المواد المستخدمة في التغليف وإحكام التغليف ومن ثم ترتيب القطع بطريقة معينة حتى لا تحدث أي مشاكل لاحقة.
• بدء تنزيل الأثاث ويتم ذلك بعدة طرق يتم تحديد أنسبها حسب ارتفاع المكان وأحجام قطع الأثاث المنقول.
• ثم النقل بالسيارات والتخزين في مستودع الشركة الذي تم إعداده مسبقًا كي يكون مكان مناسب لتخزين أي نوع من أنواع الأثاث.
شركة تخزين اثاث بالخبر
شركة تخزين اثاث بالجبيل
شركة تخزين اثاث بالقطيف
شركات نقل عفش بالدمام
ReplyDeleteشركات نقل عفش بالخبر
شركات نقل عفش بالجبيل
شركات نقل عفش بالقطيف
شركات نقل عفش بالاحساء
شركات نقل عفش بالظهران